Transform An IKEA Kallax Shelf Into A Fluted Beauty
We may receive a commission on purchases made from links.
Perhaps one of the greatest attributes of IKEA furniture (aside from its affordability, of course) is the endless potential to customize it according to your own style. The KALLAX shelf is well-loved for its uber-functional storage cubbies, which work well for organizing a myriad of items from home office supplies to playroom toys. And it's so easy to change up the look with paint, contact paper, overlays, or in this case, pole wrap. This ultra-trendy material lends a gorgeous fluted look to the doors, taking it from plain to pretty darn chic in this easy IKEA hack.
Things Needed
Tip
We used a white KALLAX shelf since we already had it on hand, but it now comes in a white oak finish, so you could skip having to add wood veneer to it, and save some time and money!
Here's a "before" look at the shelf:
 Trisha Sprouse
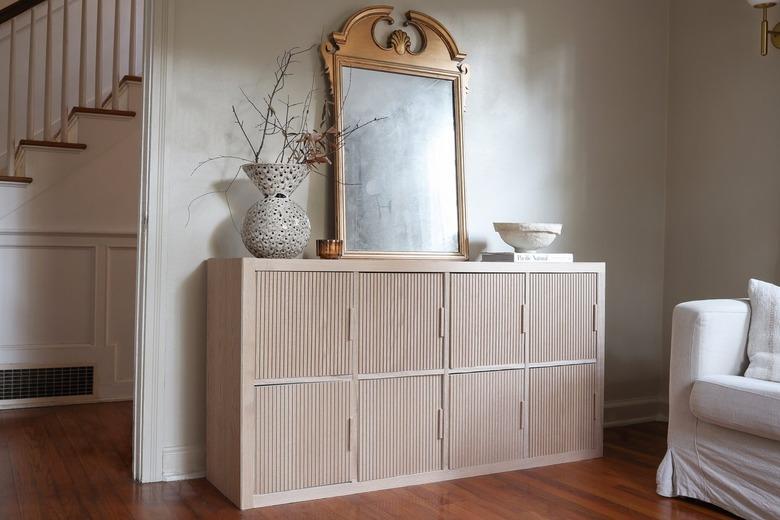
And here's the "After":
 Trisha Sprouse
Step 1
Measure and cut a piece of wood veneer to fit on the top surface of your shelf. Line it up at one end, slowly peel off the backing, and press it into place. Be careful not to cut yourself, since veneer can splinter just like regular wood.
 Trisha Sprouse
Step 2
Measure and cut strips of wood veneer, and attach them to the front facing of the cubbies.
 Trisha Sprouse
Step 3
Next, you'll need to cut two pieces of pole wrap to cover the sides of the shelf. Start by using a power saw to cut a segment of pole wrap to the same height as the shelf.
Tip
The pole wrap is pictured face up for illustrative purposes, but it's actually better to cut it face down so it doesn't splinter.
 Trisha Sprouse
Step 4
Use a utility knife to cut along one of the vertical slits of the pole wrap so that it's the same depth as the sides of the shelf.
 Trisha Sprouse
Step 5
Pipe a generous amount of construction adhesive on the back of the pole wrap.
 Trisha Sprouse
Step 6
Firmly press the pole wrap to the side of the shelf and use painter's tape to hold it in place. Then nail it to the shelf with a brad nailer to ensure it's securely attached. A few nails along the top, center, and bottom ought to do it. Repeat on the other side of the shelf.
 Trisha Sprouse
Step 7
Fill any gaps where the wood veneer and pole wrap meet with wood filler. Also fill in the nail holes on the sides.
 Trisha Sprouse
Step 8
Cut pieces of pole wrap to the same dimensions as the KALLAX door inserts—making the horizontal cuts with the saw and the vertical cuts with a utility knife.
 Trisha Sprouse
Step 9
Cut and attach a strip of wood veneer to the outer edge of the KALLAX door insert. This is to avoid having any white show through because the pole wrap doesn't quite cover the entire surface when you cut it to size. (Again, you can skip this if you're using the KALLAX door inserts that already have an oak finish.)
 Trisha Sprouse
Step 10
Pipe construction adhesive onto the back of the pole wrap and glue it to the fronts of the door inserts. Follow up by nailing the pole wrap in place with a brad nailer, and fill the nail holes with wood filler. Repeat for as many doors that you have.
 Trisha Sprouse
Step 11
Attach the doors to the shelf according to the manufacturer's instructions. You may find that you need to sand down the pole wrap in some areas to make it easier to open and close some of the doors.
 Trisha Sprouse
Step 12
While the shelf looks beautiful as-is, it'll be much more functional to add handles to the doors for easy access. We decided to create handles out of pole wrap so they'd blend in seamlessly with the fluted design. Start by cutting a 4-inch segment of pole wrap with the power saw. Then use a utility knife to separate each vertical slat from each other. Stack and glue two slats together and voila! You have a door handle.
 Trisha Sprouse
Step 13
Glue and brad nail each handle in the center of the door (on the side that opens, which will vary depending on how you installed them). We installed each door to open on the right side, so we attached all of the handles centered on the right side of each door.
 Trisha Sprouse
Step 14
Sand all the areas you filled with wood filler, wipe away any dust, and then stain and seal your shelf with your desired color and finish. We wiped on one light coat of "Pickled Oak" by Minwax with a rag followed by brushing on two coats of a clear matte Polycrylic topcoat.
 Trisha Sprouse
Now tuck whatever you'd like into your cubbies and style it up with your favorite accessories. Whether it's shoes, linens, clothes, office supplies, toys, or board games that are hiding behind the doors, your newly transformed KALLAX shelf is sure to add great style to your space!
 Trisha Sprouse