Transform A Humble IKEA Dresser Into A Gorgeous Bedroom Piece
We may receive a commission on purchases made from links.
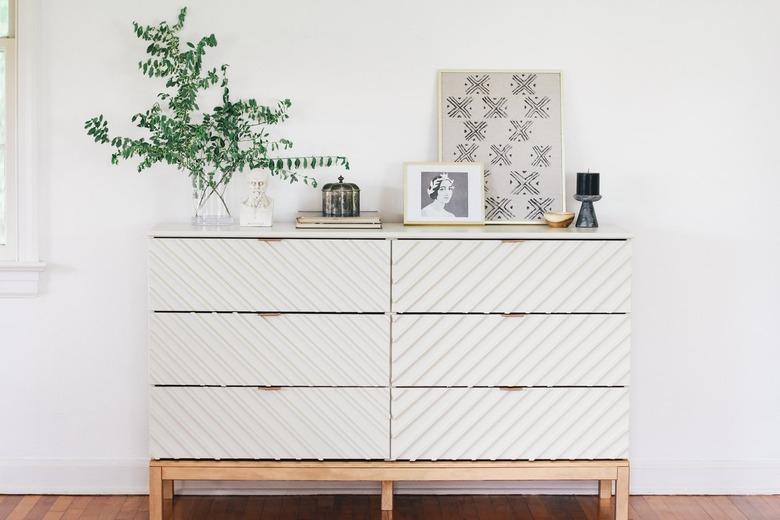
As Pinterest, Instagram, and Facebook can attest, we all love us some IKEA furniture. The only issue is that since many of us own a piece (or two or three ... ), it can tend to leave our living spaces looking a tad unoriginal. Enter the IKEA hack: We jumped head-first into the maker movement to transform this humble Tarva dresser into a stunning chest of drawers that looks as if the wood has been intricately carved. Vintage oyster-hued chalk paint paired with gilded touches in the legs and hardware elevate the piece into a design superstar.
 Trisha Sprouse
Things Needed
-
Ruler or carpenter's square
-
Construction adhesive ("liquid nails")
 Trisha Sprouse
Step 1
Use a screwdriver to remove the knobs from each drawer. They're a dead giveaway of an IKEA dresser, no?
 Trisha Sprouse for Hunker
Step 2
Fill in the holes from the knobs with wood filler and smooth it out with a putty knife. Once dry, sand down the wood filler until it's smooth and then wipe it clean.
 Trisha Sprouse for Hunker
Step 3
Lay the dresser flat on the floor with the drawers facing up (definitely enlist someone to help you). Use a speed square to mark precise 45-degree angled lines spaced 1-¼ inches apart across the first top drawer. This will set the design for the rest of the drawers, so take your time getting the spacing and angles right.
 Trisha Sprouse
Step 4
Line up wood dowels diagonally on the 45-degree lines you drew on the first top drawer. Place 1 ¼-inch wide wood shims to act as spacers between each dowel to ensure the dowels stay spaced evenly across the drawer. Use a carpenter's square or ruler to mark where to cut off the excess wood on each dowel along the top, bottom, and sides of the drawer.
 Trisha Sprouse for Hunker
Step 5
Position each dowel at a 45-degree angle in the miter box and cut off the excess wood that you marked on the dowels. Yes, we are old school and hand-sawed each dowel, but if you have a power miter saw to do the job, we totally bow.
 Trisha Sprouse for Hunker
Step 6
Arrange the cut dowels on the lines drawn on the first top drawer again, placing wood shims in between each dowel to ensure even spacing. One by one, glue each dowel in place with construction adhesive ("liquid nails"). Just be sure to remove the adjacent wood shim as you glue each dowel down, as you don't want to inadvertently glue one of the shims down. That would not be ideal, just sayin'.
 Trisha Sprouse for Hunker
Step 7
Once the first top drawer is done, repeat Steps 3 through 6 for the drawer immediately below it. Use the dowels on the first drawer as a guide to line up the dowels on the second drawer. You want the dowels to look like they form continuous lines across the drawers.
 Trisha Sprouse for Hunker
Step 8
Continue lining up, marking, cutting, and gluing dowels on the third drawer before moving on to the drawers on the other side of the dresser.
Once you get to the next side, begin at the top drawer again, this time arranging the dowels at 45 degrees so that they form a "V" shape with the drawers next to it. Mark, cut, and glue the dowels in place on the top drawer, and then use them as a guide for cutting and gluing dowels on the remaining two drawers below it.
 Trisha Sprouse
Step 9
Once the glue has dried on the dowels (about an hour, or a glass of wine), lightly sand the entire dresser including the dowels to prep the surface for painting. Wipe away any dust with a clean cloth.
 Trisha Sprouse
Step 10
Use a roller brush to paint a coat of primer on the top and sides of the dresser. Remove the drawers and use a paintbrush to prime the drawer fronts. Technically, you don't have to prime when using chalk paint, but bare wood is quite porous, and we didn't want to risk the tannins mucking up any of our pretty water-based paint. Also, we were quite keen to cover up the wood grain on the dresser.
 Trisha Sprouse
Step 11
Once the primer is dry, paint the first coat of chalk paint on the dresser and drawers. Be sure to paint in the direction of the wood grain. Allow the paint to dry fully before painting a second coat on top.
 Trisha Sprouse for Hunker
Step 12
Once the paint has dried, apply a few coats of protective clear finish on top to protect your paint job, sanding between each coat. We opted for a clear polycrylic topcoat with a matte finish because we wanted to preserve the matte look of our chalk paint.
 Trisha Sprouse for Hunker
Step 13
To totally gild the lily, we used gold gilding paint on the legs of the dresser. We found only one coat was needed. But whew, this stuff is potent! Paint in a well-ventilated area, okay?
 Trisha Sprouse for Hunker
We also gilded the hardware with the same paint to match.
 Trisha Sprouse
Step 14
Lastly, install the new hardware at the center of each drawer, making sure to use screws short enough that they don't come through to the front of the dresser. Annnnd done — your gorgeous new chest of drawers is now ready to use.
 Trisha Sprouse for Hunker
Sleek, modern, and most definitely one-of-a-kind. Time to get out your camera and start snapping.
Trisha Sprouse
 Trisha Sprouse for Hunker
 Trisha Sprouse for Hunker