Dollar Tree Pool Noodles Are The Secret Tool To Making A Luxe DIY Accent Chair
Building your own DIY custom furniture is no mean feat, though the effort and time put into these complex projects typically shows in spades with the end result. When time, energy, and care is put into crafting unique furniture pieces, the pride the maker feels and one-of-a-kind vibes a piece gives off usually make the arduous process worth it (rose-colored glasses, right?). While these more advanced DIYs may not be for the faint of heart, for those adventurous crafters willing to put in some TLC, there really isn't a more satisfying result than a beautiful, incredibly special piece of furniture you get to enjoy every day.
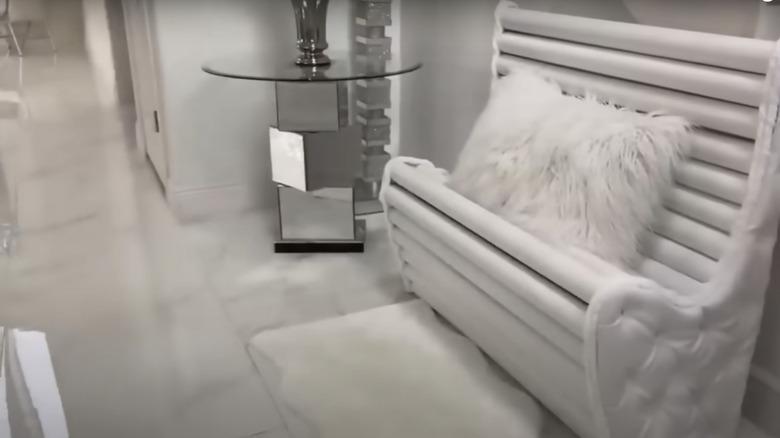
One such DIY was shared by Yoduvh Essentials on YouTube, where the maker, Yvonne, created a modern horizontally-channeled chair using pool noodles as the basis for her seat and upholstery foam. The faux-leather-wrapped noodles are held in place with copper pipes slid through the middle and two plywood side panels for support. While the premise is extremely clever and there's a lot to love about the incredibly layered DIY project, after some trial and error, the DIYer herself suggested there might be other ways to approach the project for added stability. And absolutely not knocking Yvonne's efforts in the slightest, we've used her process as a jumping off point and brainstormed a few alternative methods to improve chair stability and refine the finished look so you too can create this amazingly smart pool noodle chair for yourself. So using the YouTube video for reference and a few fresh steps, let's dive right into this moderately-advanced DIY that is sure to impress.
Plan out the chair shape with practical research for the measurements
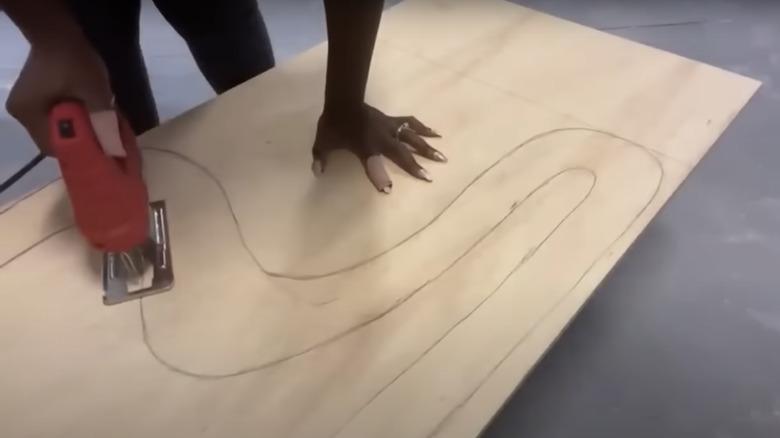
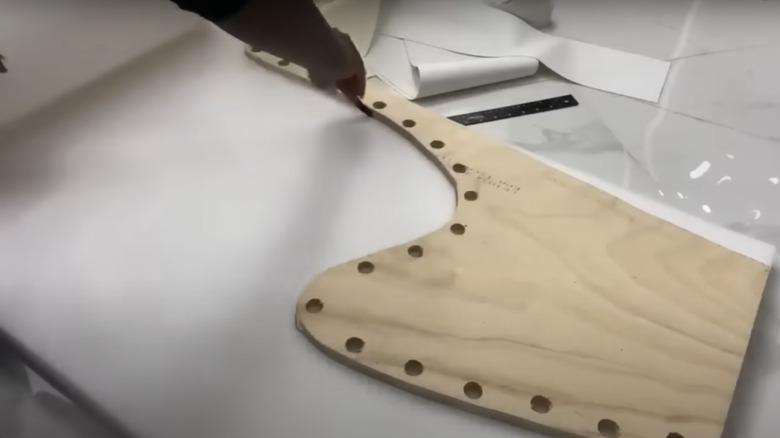
To begin, you'll need to plan out the shape of your chair by creating the two side panels that will hold the pool noodles between them. This is arguably the trickiest part of the DIY, as there are no instructions as to how Yvonne created the shape. Your best bet would be to research average proportions of chairs, such as common seat and back heights and depths, as well as comfortable pitch angles. You can also grab a measuring tape and do some practical research by measuring a chair at home that's similar in size to what you're planning. Once you have your desired sizing, measure out and connect the points by drawing a freeform shape. Take the video's retrospective advice and use a 1-inch thick plywood (instead of half-inch) to make the panels studier. Use a jigsaw to cut out one panel, then use that panel to trace and cut a second matching side. Before proceeding, use the plywood side panels to trace out a paper or cardboard template for future use.
Next, determine the width you'd like to make your chair. For reference, a dining chair ranges from about 18 to 22 inches wide, a side/ocassional chair is about 24 to 30 inches wide, and a comfy lounge chair is more like 30 to 36 inches or more. Depending on the type of chair you want and the space available, you can tailor the width to suit your needs. Be sure to plan for the thickness of both side panels into the overall width. Once you know your desired size and have subtracted the dimensions of the side panels, you have the seat width, i.e. the cut length of the pool noodles – but don't cut yet!
Determine pool noodle layout by laying out sample discs and tracing the inner holes for drilling
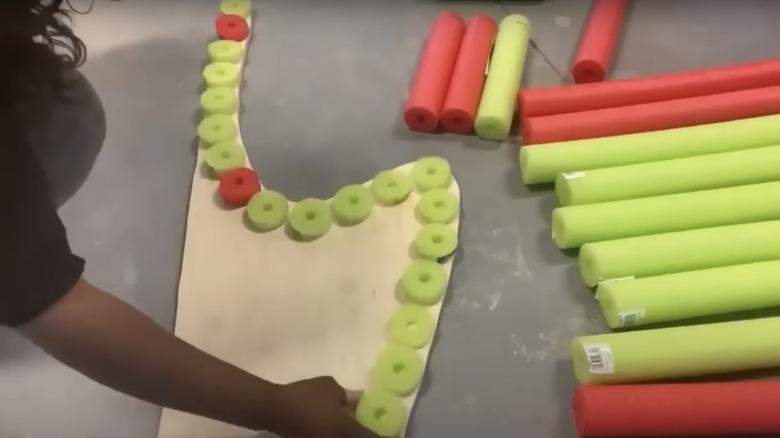
Next, you'll need to determine how many pool noodles the project will take. The easiest way is to chop a pool noodle into approximately 1-inch thick discs so you can lay them out on one of the side panels like in the video, with each one touching the one beside it to reduce gaps in the final product. This way, you can visualize and experiment with the layout of the pool noodles to make sure you are happy with it before drilling. Be sure to line them up with the edge of the plywood panel, insetting each just slightly so the panel will fully cover the entire side of the pool noodle. The video didn't do this and had to add yarn to cover the mistake.
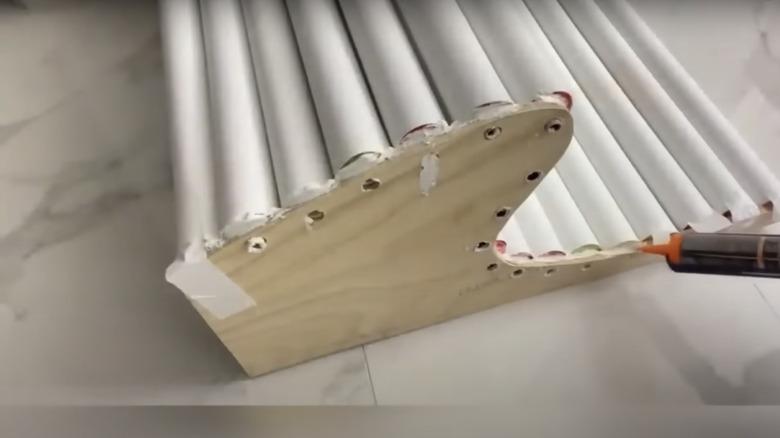
Once you've solidified your noodle locations, trace each of the center circles as the locations for drilling. Using a drill bit designed for making holes the same size as your piping, drill a hole for each circle location. Use the completed first panel as a template to trace the locations onto the second side panel and repeat the drilling process to make matching holes on each.
The YouTube video uses half-inch copper pipes cut to size with a pipe cutter. However, for added stability and no need to cut, opt for a standard length steel plumbing pipe with threaded ends, such as this 30 inch wide version from Home Depot. There are many options in various lengths to avoid the need to cut. Plus, since the pipes have threaded ends, it'll give you better options for properly securing the pipes in place besides relying on just construction adhesive and good vibes like the video.
Use threaded flanges on the outside of the panels to secure the pipes in place better than adhesive
Before cutting the pool noodles to their final length, do a dry fit with just the pipes to ensure you have the proper final dimensions. Skipping ahead a little, you can use a flange like this on the outside of each side panel to secure the pipe (more on this below), so be sure to plan for the threading to stick out the depth of the flange past the panel on each side. Once you've done a test run to verify the inner seat dimension, cut all pool noodles to size.
Next, slide a pipe into each pool noodle, leaving the sides of the pipe exposed on each end where they will slide into the holes in the side panels. Cover each pool noodle with a fabric or faux leather of choice, cutting a piece to size and using hot glue or a spray adhesive to stick it to the foam. Insert each noodle-wrapped pipe into the matching holes on each side panel so it rests between. You may need to recruit a buddy for help.
The DIYer simply placed all of the pipes between the holes in the two side panels and then added a ton of construction adhesive to keep them in place. But for a more secure method, use a pipe flange on the outside of each side panel, threading it onto the exposed end of each pipe and using appropriately-sized screws to mount the flange to the plywood. This method will withstand wear and tear far better than adhesive alone. Once secured, spin all fabric seams of the pool noodles towards the back of the chair so they aren't visible.
Use foam and fabric to upholster the outside of the side panels and cover the flanges
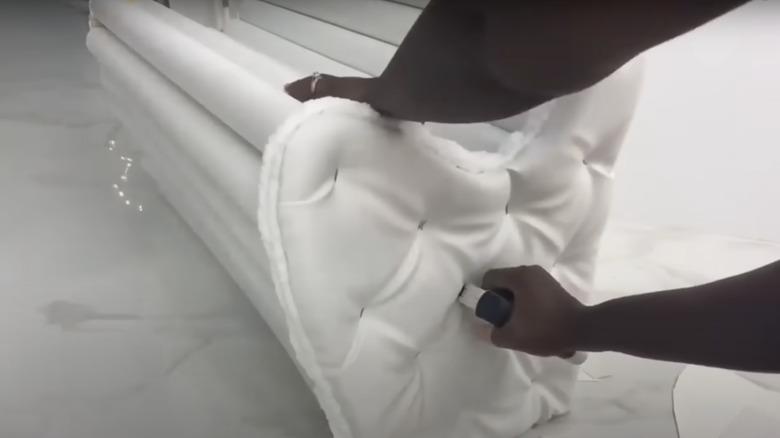
Time for final touches! The YouTuber used a thick yarn to cover the edges of the pool noodles and then a side panel cover with hardboard and foam. However, this didn't end up looking very refined and had many unnecessary steps. So we're simplifying the side panel process. Begin by painting the inside of each panel a similar color to the fabric, if desired, to blend so it isn't visible through the gaps between noodles.
Using the panel template (or the actual plywood panel if done earlier in the process), trace the shape onto a piece of 1-inch-thick soft foam. Before you cut, you can add an extra inch to all but the bottom edge of the panel shape so it'll wrap over the edges of the panel for extra padding. Cut out the foam and use a spray adhesive to secure it to the outside of each panel over the flanges. The softer the foam, the more the flanges will sink into the underside. Cut a piece of fabric or faux-leather that's about 4-5 inches larger than the side panel template all the way around. Lay it flat on the ground and tip the chair onto its side, placing the side panel in the center of the fabric. Wrap the excess fabric over the edges of the panel, tucking it under the pool noodles on the other side and securing it with a staple gun in a location that'll be hidden underneath the side of the noodles. When you get to the underside with no noodles, fold under the end of the fabric and secure the staples in a neat line along the inside edge of the panel.
Cover the back of the chair with an upholstered hardboard panel and add tufting to the sides if desired
To finish off the DIY, you will need to cover the back side of the chair to hide the inner workings. Cut a thin hardboard panel the width of the back of the chair from the rear edge of one side panel to the other and from top to bottom. You can add a layer of thin foam with spray adhesive if desired for added authenticity and softness, but you can also just upholster the board itself since the back may not be very visible in your application. Wrap it in fabric with spray adhesive, covering the edges and securing it to the back. Use your staple gun to attach it to the rear edge of the side panels, covering the staples with decorative trim or buttons as needed.
If you'd like to add tufting to the outer side of the panels like in the video, use your staple gun through the foam to the plywood to create the indent and cover with a hot-glued button. Just be sure to clear the flanges underneath the foam before placing your outermost tufts.
And there you have it, a pool noodle chair DIY that has been altered and finessed for additional stability and refinement. Though it's a more advanced project with many steps, the result is a custom, one-of-a-kind chair tailored perfectly to your aesthetic and space. What do you say: Would you give this unique DIY a try?