Beautiful DIY Garden Trellis Ideas That Will Transform Your Backyard

We may receive a commission on purchases made from links.
There aren't many garden challenges that trellises don't solve. Beyond giving your vining and climbing plants better air circulation and the framework they need to grow, installing a trellis is one of the easiest ways to add vertical interest and maximize space in any size yard. You can choose from several styles, depending on the plants you're growing and your overall backyard design. Sun-loving crops will love the angle of an A-frame structure, which can allow them to get more direct sunlight than they would growing vertically. Vibrant flowering vines look stunning as they weave through graceful arches, fan‑shaped trellises, or classic lattice frames.
Don't let the height of some of the trellises you've seen deter you. You don't need a large tool shed or even a sizeable backyard to tackle most of the projects below. While some require basics like a hammer and a few leftover nails, some DIYs are completely tool-free. You may even be surprised to find you already have everything you need, though you may need to stop by a hardware store for a few inexpensive pieces to tie it all together. Luckily, it doesn't take a lot of money or specialized skills to build a beautiful trellis for your back yard. Whether you're growing vegetables in containers, working with a large garden bed, or simply want to create a dreamy landscape, these trellis ideas below will help you hit any landscaping goal.
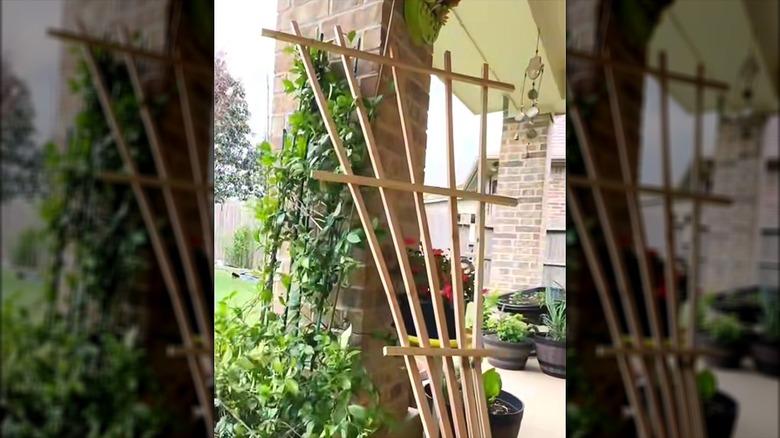
Design a cottagecore trellis with bamboo canes and twine
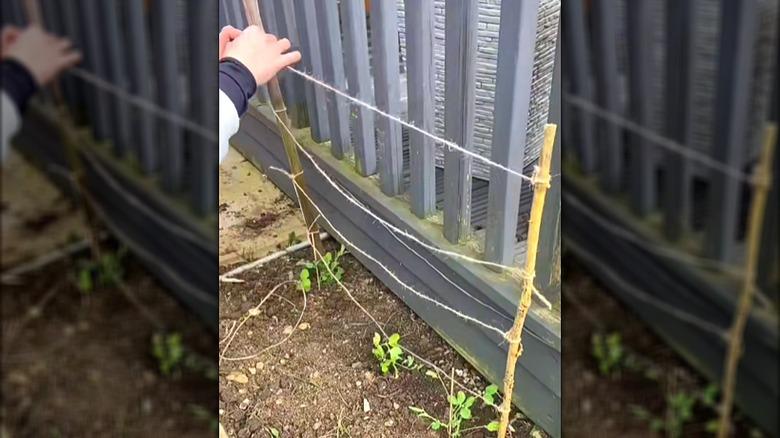
If you've been growing a bamboo fence in your backyard, you already have half the materials for this nature-inspired, cottagecore trellis. With just a few canes and some twine or string, you can craft a simple but charming support for smaller climbing or vining plants. While some types of twine are synthetic, many are made from natural fibers, making this a biodegradable, earth-friendly option. This DIY is perfect for gardeners who prefer to take an eco-friendly approach, want an inexpensive trellis, or simply don't want to fuss with an elaborate build to create something beautiful.
To install this easy-to-make trellis, grab a few sturdy 6- to 7-foot-tall bamboo canes, and use a hammer or mallet to drive them at least a foot deep into the soil to keep them secure. If they're placed too shallow, they can shift or dislodge from the ground. Grab some twine, and tie it to one end before wrapping it at least two times around each cane. Make sure to keep the string taut and tie strong knots so they don't fall under the weight of your vegetables. This method is best for lightweight plants like snap peas, as the support may not be strong enough to hold the fruits of heavier varieties.
Bend cattle panels into a dreamy arching garden trellis
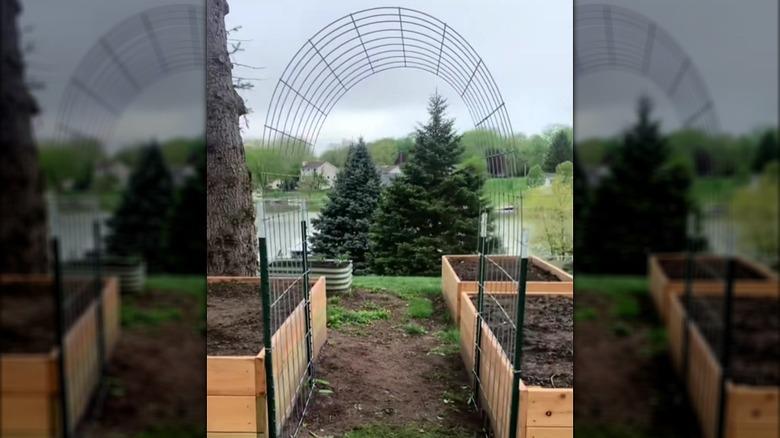
There's a lot to love about installing an arched trellis in your back yard. As your plants climb up the sides and the top, it creates a dreamy focal point while providing plenty of space for your flowers or veggies to grow. Not only is it perfect for adding vertical dimension to your landscape, but it also benefits your plants. The added air circulation around their vines and fruits helps prevent excess humidity, which helps minimize the risk of fungal infections like mildew. Although this eye-catching garden feature may look expensive when draped with greenery, you can do it yourself for less than you may think.
Follow an idea from TikTok to make a stunning curved trellis using a cattle panel and four T-posts. Cattle panel is typically 16 feet long and 50 inches wide, so you'll need a truck or other form of transportation that can easily manage its size. Some T-posts come with metal clips you can use, but if not, wrap zip ties along the top, middle, and bottom to secure everything in place. The wire edges may be sharp, so make sure to wear a thick pair of gloves and smooth any rough edges with a file or deburring tool before shaping the panel. Once installed, you'll have a tough arched trellis that can hold the weight of many of your larger crops with plenty of space for them to grow and spread.
Support your climbing plants with a chicken wire frame
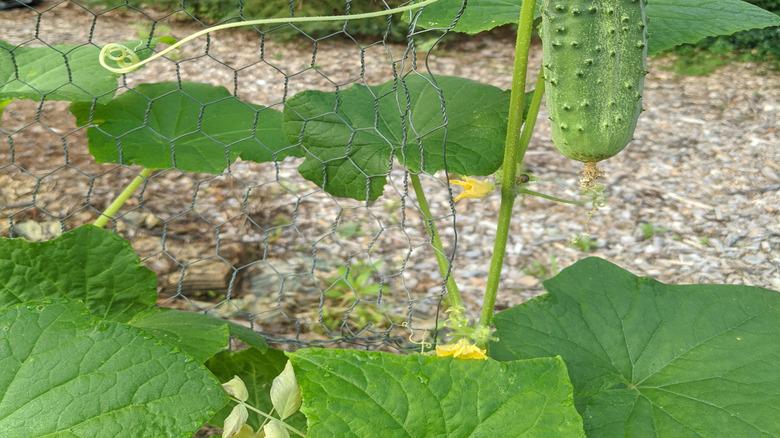
Between the soil, fertilizer, seeds, and a bed, the cost of starting a vegetable garden can quickly add up. Luckily, there are several ways to save money when growing your crops. Chicken wire provides the perfect material for building a trellis, as it has plenty of crevices for your vining plants to latch onto, making this a quick and easy project. Even better, it's typically an inexpensive material you can find online and at several retail stores. This simple DIY is ideal for gardeners who'd rather spend their money on plants than pricey structures, but want a support that's sturdy enough to get the job done.
Although chicken wire has several benefits, its biggest drawback is its lack of strength. While it can support climbing vegetables when properly attached, it's too flimsy to stand on its own and needs to be secured to a sturdier frame for stability. If you have a raised bed, @edenbrothers on TikTok recommends using screws to attach the posts to the bed to better hold it in place. For gardeners working with plants directly in the ground, make sure you drive the stakes deep into the soil so the trellis won't wobble or topple over under the weight. Use zip ties to attach the chicken wire to one side, pulling tightly before securing it to the other end post. Opt for galvanized wire mesh, like Vnesovo's Galvanized Chicken Wire, as it's less likely to rust.
Build an inexpensive trellis made out of ladder mesh and garden wire
If you don't have the car space to bring home larger materials like cattle panel, you can still easily make a sleek arched trellis for your garden. Ladder mesh is typically about 8 feet long, but it's flexible enough to bend into a smaller vehicle or even carry in a rolling tote. While it's easy to shape, the wire frame has the strength to provide support for most vining flowers or vegetables to climb across. It's a great option for gardeners who want an eye-catching curved trellis, but don't want to take up a ton of space in their garden. The best part? It's inexpensive and easy to work with, so nearly anyone can tackle this project.
When making your arch, you may need to combine a few pieces of ladder mesh to add more length. TikToker @diariesofaplantgirl recommends using a roll of dollar store gardening wire to attach multiple pieces. She does so by laying the ladders on top of one another and tightly wrapping the wire over the overlapping section. To give your plants extra areas to latch onto, she recommends using the wire to create an "x" shape in each square section. This method is best for garden beds or sturdy containers, as the wire is too thin to anchor directly into the ground. That said, you may be able to make it work with a few stakes and zip ties.
Repurpose an old metal bedframe into a sturdy trellis
One of the greatest joys of thrifting is the thrill of the treasure hunt as you search for unique pieces with character and history. Possibly even better, however, is finding something meant for one purpose and giving it an entirely new life. One thrifter on TikTok took an old twin metal bedframe and instantly transformed it into an effortless trellis. The beauty of this DIY is that you don't need any fancy tools or a lot of time. All you need is a fresh perspective and some previously used furniture to add a functional trellis to your home or yard.
To get a no-fuss support for your plants, head to your local thrift store to see if you can find any metal bed frames, old crib frames, or anything else that could double as a trellis. Alternatively, check online marketplaces to see if you can find any good deals; you can often score secondhand furniture for free. Once you find the perfect piece, sand off any rusty or rough areas and apply a weatherproof seal before using. If you want to attach a small bed frame or similar item to your porch railing, use hardware like hose clamps to hold it in place. When attaching it to a garden bed, use U-shaped conduit straps to wrap around the metal bars and screw into the wooden sides. Be sure to wear durable gloves when working with old metal frames, to avoid nasty and unexpected scrapes.
Transform wood pallets into an A-frame trellis

There are so many creative DIY wood pallet projects you can try to enhance your garden for little to no cost. You can usually score a few pallets for free by searching online marketplaces or asking your local retail stores. Because they're made from sturdy wooden boards, they're tough enough to hold even your heaviest vining plants and will last for years in your garden. Once you take them apart, you can easily customize their size and shape in a way that best suits your yard or garden.
When hunting for pallet boards, check for a stamp that says HT, indicating that the wood was heat-treated, not chemically treated, for pests. Once you have a couple of wooden pallets, you can either take them apart to rebuild if you have a bit of muscle and aren't afraid to get your hands dirty, or use them as-is. Disassembling pallets can be a bit challenging, and you may need specialized tools, like a cat's paw nail puller or a reciprocating saw, to save yourself some time. The easiest method is to attach hinges to the top, allowing you to create a foldable A-frame trellis that you can easily position over your garden bed. Plus, you can always adjust the angle to suit the plants you're growing.
Craft a fan trellis from a single fence board
Fan trellises are a must-have for gardeners who want to make a big impact with a small amount of space, though they're great for sprucing up any yard. They aren't ideal for heavy vegetables, but they look stunning with vining plants weaving up and across the beams. Consider growing climbing roses or other flowering vines to add a pop of color along with vertical interest. While store-bought versions can be pricey, TikToker @buildtomade shared a clever hack to create your own stunning fan trellis using nothing more than a single wooden fence picket and a few basic tools.
Although the project is easy enough for beginners to handle, you will need a saw and a few tools to get started. When shopping for fence pickets, choose a wood that has a bit of flexibility to prevent snapping as you create the fan shape. Cedar is one of the best options because it's also naturally resistant to rot and stands up to harsh weather conditions. A fan trellis looks beautiful simply leaning up against a fence corner, but if you're worried about wind, it may help to attach it to metal stakes for extra stability. Don't be afraid to experiment with the fan shape — angling the slats closer together will help create a privacy screen effect, while spacing them out gives it a more airy feel.
Use an old wooden ladder for your veggies to climb up
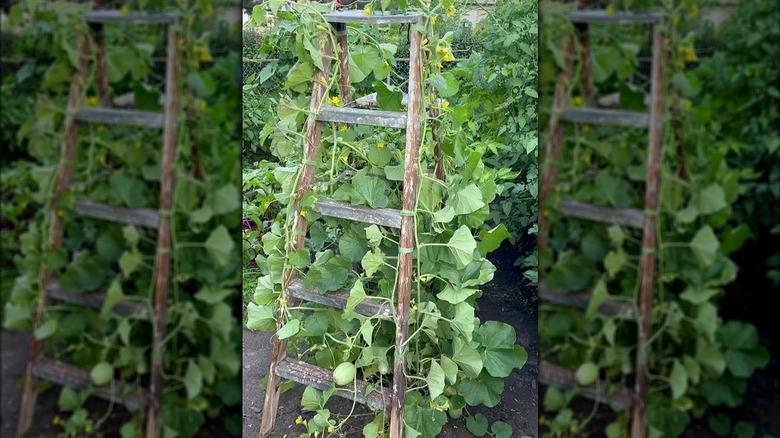
If you've got an old wooden ladder that's been collecting dust in your garage or basement, you can give it an unexpected purpose for your veggies or flowers. This hack is made for upcyclers who love the weathered look of rustic glam decor and need a cost-effective structure for the garden. You can easily set it up over a small bed or sneak a couple of container plants underneath. Cut the top board in half and you'll get two trellises for the price of one. Make a patio entrance with matching ladders or position one ladder where it catches the morning sun and the other for afternoon rays.
It may take a little prep work before you can place the ladder out in your yard. Check for any rotten or rough areas and give it a light sanding before applying a non-toxic sealant. If you like, add a few fresh coats of weather-proof paint that match your garden aesthetic. Consider weaving some jute netting or string between each of the rungs to give tendrils more to grip. If you opt to split it into two trellises, it's a good idea to reinforce each one by attaching it directly to the fence, installing anchors, or weighing it down with sandbags.
Create any size trellis around your raised bed with T-posts and twine
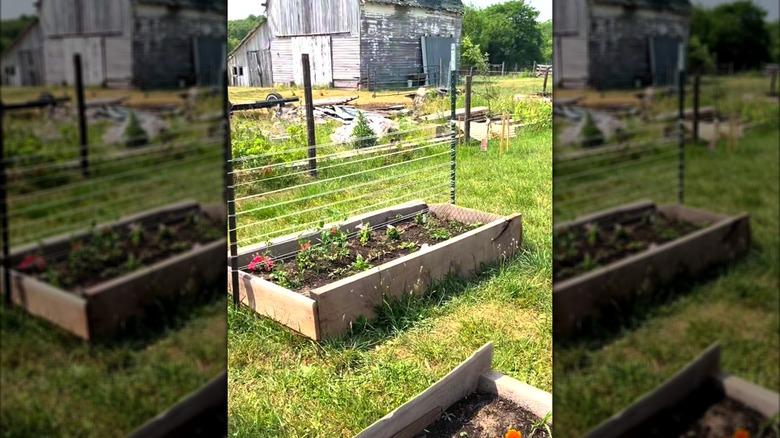
Whether the vining plants in your garden bed are planted in the middle, by the edge, or all over, this easy trellis idea is for you. It can be challenging to figure out how exactly you're going to provide enough climbing space if most of your crops are vining varieties, especially if you're working with a small space. Luckily, TikToker @_sleepyhollowfarm shows us that with just a few T‑posts and some garden twine, you have everything you need to build a completely customizable trellis that works perfectly for any raised garden bed. If you decide to switch up your layout down the line, it's easy to uninstall and remake to suit the new lineup and dimensions each season.
Place a T-post at each end where you want your trellis to be. If you have a large bed that needs support on all sides, leave at least one section open so you can still easily access your plants to remove dead leaves, fertilize, and perform other gardening tasks. Tie a tight knot on your first post, then keep the twine pulled taut as you stretch it to the next posts, wrapping it a few times above each hook or notch. While garden twine works great for lighter veggies, swapping it for galvanized steel wire gives you extra durability for heavier crops and long‑term use.
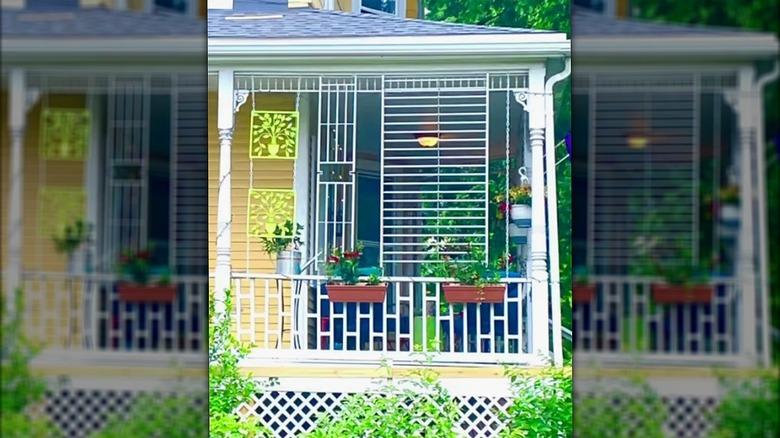
Turn your exterior into a garden feature with this DIY diamond trellis
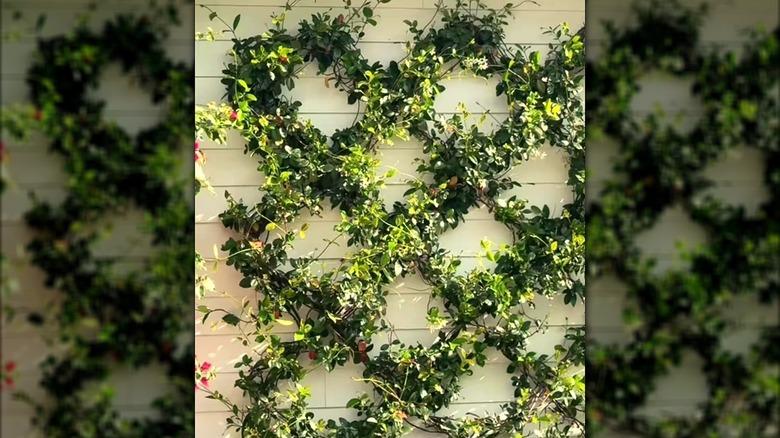
While a fresh coat of paint can be enough to glam up your home's exterior, you can kick it up a notch by adding a sleek, diamond‑pattern cable trellis that lets vines transform your wall into a textured green accent. This hack is perfect for anyone who wants that eye-catching lattice look without dropping money on a store-bought panel. It's great for ivy, honeysuckle, clematis, or any other vining plant that will happily latch onto the wire to create the geometric shapes. You can use this setup to decorate a fence, create a planter box backdrop, or make a portable trellis with a detached freestanding frame.
To map out the pattern, TikToker @allisonbickerstaff uses painter's tape to create the shapes before drilling in eyehooks for the wire. However, if you don't want to leave holes, opt for siding hooks, like MUAKIOY's siding clips, which can hold up to 18 pounds and are easy to pop off and reposition. Otherwise, choose sturdy stainless steel eye hooks that won't rust after a few heavy rainfalls. It's best to drill into studs, so identify where they're located before you work out the pattern or pick up the drill. Install the trellis before planting or when your vines are still young so you can gently train each shoot into your diamond pattern.