Add Chic Reeded Glass To The Popular IKEA Billy Bookcase
We may receive a commission on purchases made from links.
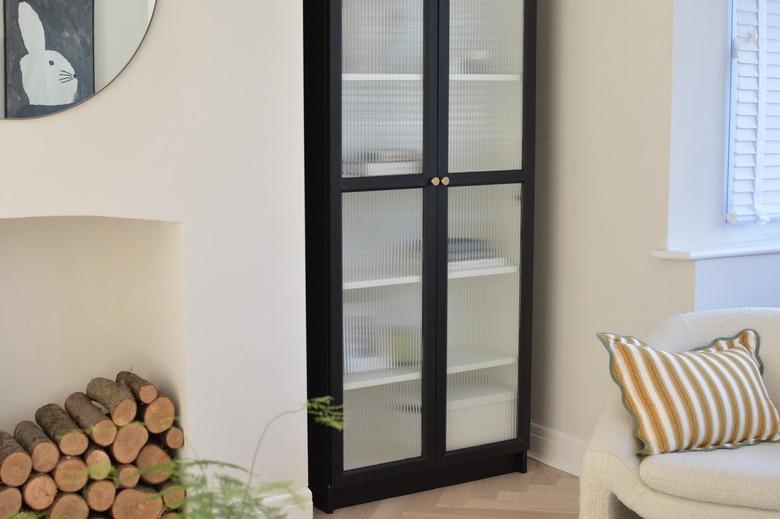
The humble Billy bookcase is an iconic piece of IKEA furniture, and it's easy to see why: the versatility, simple design, and budget-friendly price tag make it the perfect blank canvas for anyone wanting to transform a basic bookcase into a statement piece.
We'll show you how to elevate the Billy bookcase into a design-worthy display cabinet with some paint, a reeded glass treatment, and new hardware. This sleek IKEA hack actually requires minimal DIY experience making it a perfect project for all skill sets.
 Caroline Burke
Step 1
Before you start any painting prep, assemble your Billy bookcase, but don't add the doors right away. (We'll add them later.) Stand the bookcase away from the wall because we're going to be painting the sides and doors, and it's much easier to do this if you can move freely around it.
 Caroline Burke
Step 2
Most IKEA furniture has a shiny surface that paint will struggle to adhere to. Quickly rough up the surface on the bookcase exterior and doors using 180-grit sandpaper.
 Caroline Burke
Tip
For more tips on how to DIY IKEA products, read: 3 Things to ALWAYS Do When Creating IKEA Hacks
Step 3
Tape up the glass on the doors. It doesn't need to be perfect, you can use a glass scraper to remove any excess paint on the glass later.
 Caroline Burke
Step 4
Use a foam roller to prime the doors and sides of the bookcase. We recommend a shellac-based primer as it has the best adhesion making it ideal for smooth surfaces.
 Caroline Burke
Step 5
Once the primer is dry you can paint the exterior of the bookcase and the doors. One to two coats of paint should suffice.
 Caroline Burke
Step 6
Once dry, remove any masking tape and attach the doors to the bookcase.
 Caroline Burke
Step 7
Next, measure the width and height of the glass panels on the doors.
 Caroline Burke
Step 8
Measure and cut the reeded window film to the size of your glass panels.
 Caroline Burke
Step 9
Take a spray bottle and fill it with 1 part liquid soap to 20 parts water. Spray the solution onto the glass panel. (Most window films are applied this way but just double-check the manufactures instructions for your window film application just to be sure.)
 Caroline Burke
Step 10
Peel off the back of the window film and spray it with the soapy water solution.
 Caroline Burke
Step 11
Place the window film onto the glass and move it into position.
 Caroline Burke
Step 12
Using a squeegee, work it in outward strokes to remove any air bubbles and excess water from the film.
 Caroline Burke
Repeat on all the glass panels to create the reeded effect.
 Caroline Burke
Step 13
Replace any IKEA hardware with slick brass handles to give the cabinet a final update.
 Caroline Burke
Tip
This DIY would work well on any style of glass cabinet, especially vintage pieces in need of a makeover.
 Caroline Burke
Fill your sophisticated new reeded storage with your favorite books, vases, and objects!