DIY Faux Limestone Bench
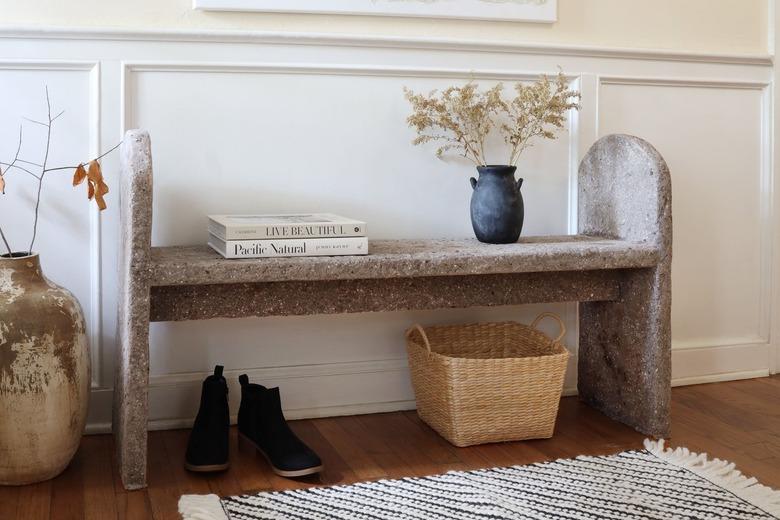
A limestone bench may not be the kind of furniture you'd expect to find in someone's home — in a park, yes, but not indoors. But that's the kind of unexpected touch we love to see in interiors. The only problem with having a real stone bench in your home — aside from the cost — is that it's very heavy and would be difficult to move should you decide to use it elsewhere. Of course, we came up with a DIY workaround by creating a bench out of wood and coating it with hypertufa (aka our favorite faux limestone material). You may have already seen us use it here and here. For just about $100, you get the look of a real-deal limestone bench that's chef's kiss without the weight or expense.
 Trisha Sprouse
Things Needed
-
Circular saw (optional)
 Trisha Sprouse
1. Cut the wood to size.
Either use a table saw or ask the hardware store to cut the wood to the following sizes (or adjust according to your desired bench size):
2-by-12-inch board:
- One 43-inch piece for the bench seat
- Two 26 1/2-inch pieces for the bench legs
1-by-4-inch board:
- One 43-inch piece for the support beam
 Trisha Sprouse
2. Mark the bench legs.
Measure four inches down from the top of one bench leg. Mark the measurement on each side with a pencil. Repeat on the second bench leg.
 Trisha Sprouse
3. Draw rounded shape on legs.
Place a large round object such as a large plate or bucket (we used a plastic bucket lid) on top of the leg. Line it up with the two 4-inch marks you just made, and draw an arc from one 4-inch mark to the other 4-inch mark. You should now have a rounded shape at the top of your bench leg. Repeat on the other leg.
 Trisha Sprouse
4. Cut rounded shape on legs.
Use a jig saw to cut along the line to create the rounded shape at the top of each leg.
 Trisha Sprouse
5. Drill pocket holes on bench seat.
Set the pocket hole jig to 1 1/2-inches, clamp it to the edge of the bench seat, and drill pocket holes on the underside of the bench seat — two evenly-spaced holes on each end.
 Trisha Sprouse
Tip
Here's a handy guide to setting the pocket hole jig to the correct material thickness and choosing the proper pocket hole screw size.
6. Drill pocket holes on support beam.
Set the pocket hole jig to 3/4-inch, clamp it to the edge of the support beam, and drill pocket holes — again, two evenly-spaced holes on each end. The image below shows both the bench seat and the support beam with two pocket holes drilled on each end.
 Trisha Sprouse
7. Attach bench seat to legs.
On each of the bench legs, mark the height you'd like your bench to be (we made ours 16 inches high). Line the bench seat up with the height mark on the first bench leg, making sure the pocket holes are on the underside.
Pipe wood glue along the edge of the bench seat, and glue it to the leg (either with a helper or using a 90-degree clamp). Drill a 2 1/2-inch pocket hole screw into each of the two holes. Repeat on the other side with the other bench leg.
 Trisha Sprouse
8. Attach support beam to legs.
Set the bench on its side, and center the support beam on the underside of the bench seat. The long edge of the beam should be butted up against the bench seat, and the two short edges of the beam should be butted up against the bench legs. Attach with wood glue on each edge of the support beam, and then drill a 1 1/4-inch pocket hole screw into each of the four holes.
 Trisha Sprouse
9. Make the hypertufa mixture.
In a bucket or plastic container, pour in three parts feather finish, two parts peat moss, and two parts perlite (or vermiculite). Add water slowly and stir until you reach an oatmeal consistency.
 Trisha Sprouse
10. Apply hypertufa to bench.
Use a putty knife to apply the hypertufa mixture to the bench. Work in small areas at a time (it starts drying in about 15 minutes), and spread it evenly. You want to cover the bench with about a 1/4-inch thick layer.
 Trisha Sprouse
As you work, press the mixture firmly to the wood with your hands (while wearing gloves) to soften any ridges from the putty knife and also to ensure better adhesion.
 Trisha Sprouse
11. Sand when dry.
Let the hypertufa mixture dry for a day or two, and then sand the entire bench with a power sander and coarse-grit pads to remove any rough edges and smooth out any craggy parts. Pay the most attention to the areas where people will be sitting frequently. Sanding is also what gives the bench more of a timeworn look, as though the rough stone has been softened by the elements over time.
 Trisha Sprouse
Add felt feet under the legs, and your beautiful new bench is ready to use. It will continue to lighten in color as it dries completely. We love using it as an entryway bench, but it can be used anywhere you like — even outdoors!
 Trisha Sprouse
 Trisha Sprouse
 Trisha Sprouse