Design A Leather-Stitched Lampshade In This Surprisingly Easy IKEA Hack
We may receive a commission on purchases made from links.
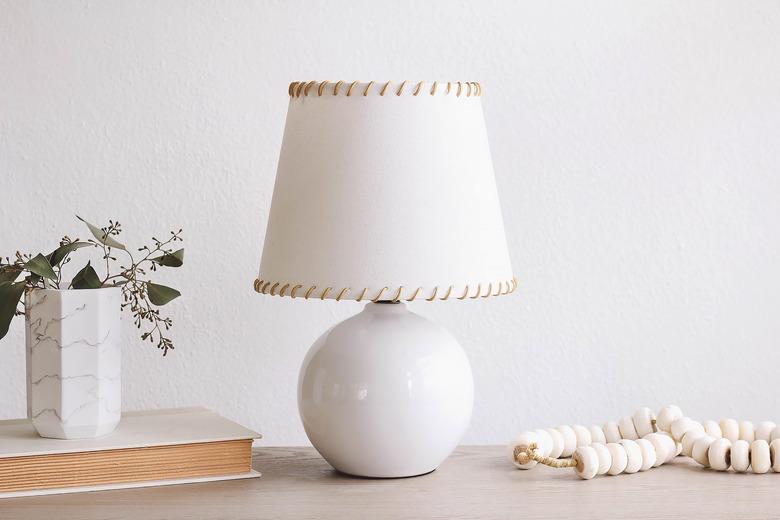
Ready for the easiest IKEA hack we've ever featured? We gave a plain SKOTTORP lampshade a custom look by adding a leather whipstitched detail around the rim. Don't worry — no sewing skills are necessary here. Seriously, it's as simple as punching holes and threading leather cord through them. We have to say, considering the minimal effort required, the texture and visual interest of the leather stitches shines a whole new spotlight on style, no matter which lamp you place it on.
Things Needed
 Trisha Sprouse
Step 1
Wrap the measuring tape around the top rim of the lampshade, and tape it in place with painter's tape. Starting at the back seam of the shade, mark a dot 1/2 inch down from the rim. Continue marking dots around the entire rim, spaced 1/2 inch apart. Do the same around the bottom rim of the lampshade.
 Trisha Sprouse
Step 2
Using the smallest hole setting on the leather punch tool, punch a hole on each of the dots you drew.
 Trisha Sprouse
Step 3
Starting at the hole closest to the vertical seam on the lampshade, thread the leather cord through the hole from the inside of the shade, and leave a tail hanging that's a few inches long.
 Trisha Sprouse
Pull the cord up over the top rim and thread it through the next hole, again entering from the inside of the shade.
 Trisha Sprouse
Continue stitching the cord in this manner until all the holes are stitched. Make sure you pull each stitch taut as you work.
 Trisha Sprouse
Step 4
After you've stitched the last hole, tie the tails of the cord together inside the shade, and cut off any excess. Repeat this process around the bottom rim of the shade.
 Trisha Sprouse
Now place your shade on a lamp, and let its newly stitched style shine bright.
 Trisha Sprouse
 Trisha Sprouse