You Need A New Coffee Table And This IKEA Hack Delivers (Caution: Serious Chicness Ahead)
We may receive a commission on purchases made from links.
Who doesn't love the Vittsjö coffee table from IKEA? First of all, it's 49 bucks. And its simple lines work well with most decor. But upon an aimless scroll down the rabbit hole of Pinterest (it happens to you too, no?), we couldn't help but fall for coffee tables like this and this, which pair sleek brass lines with a stormy black marble top. We did not, however, fall for the four-figure price tags of said coffee tables. So, with a little bit of DIY ingenuity, we figured out how to take the Vittsjö coffee table from basic to beautiful for a high-end look. And all it took was a little paint and paper.
Things Needed
-
Glass or all-purpose cleaner
-
Dropcloth
-
Scissors
-
Utility knife
-
Credit card or similar tool for smoothing
 Trisha Sprouse
 Trisha Sprouse
NOTE: The Vittsjö coffee table comes with a lower shelf, but we didn't use it, since we wanted the sleek lines of the metal base to show.
Step 1
Wipe down the entire table with glass or all-purpose cleaner, and then let it dry completely. This will ensure both the paint and contact paper adhere properly to their respective surfaces.
 Trisha Sprouse
Step 2
Remove the glass top from the coffee table and set it aside. Place the metal base of the table on top of a dropcloth in a well-ventilated area, and spray-paint it with gold paint. To avoid drip marks, it's best to spray several light coats, allowing adequate drying time (10 to 15 minutes) in between coats. Allow the base to dry completely.
 Trisha Sprouse
Step 3
Use scissors to cut a piece of marble contact paper that is wide enough to cover the glass tabletop. The width of our contact paper wasn't wide enough to cover the entire diameter of the table, so we just cut the first piece to cover as much of the table as possible.
 Trisha Sprouse
 Trisha Sprouse
Step 4
Carefully peel away one corner of the adhesive backing.
 Trisha Sprouse
Adhere the corner of the contact paper to one side of the table, and then continue slowly pulling the backing off underneath the contact paper as you press and smooth the paper across the glass tabletop.
 Trisha Sprouse
Step 5
Use a credit card or similar tool and scrape it across the contact paper, starting from the center and moving out toward the sides to smooth out any air bubbles.
 Trisha Sprouse
Step 6
Use a utility knife to cut away the excess contact paper around the perimeter of the table.
 Trisha Sprouse
Step 7
If you end up with any air bubbles (don't worry — it happens!), simply use the tip of a utility knife or safety pin to poke a tiny hole in the air bubble, and then smooth it out with a credit card. Works like a charm.
 Trisha Sprouse
Step 8
Cut a second piece of contact paper large enough to cover the remaining portion of the glass tabletop.
 Trisha Sprouse
If possible, try to line up the pattern of the marble so the lines look somewhat connected to each other. This will make the two pieces of marble look more like one cohesive piece. Adhere the paper in the same manner as the first piece.
 Trisha Sprouse
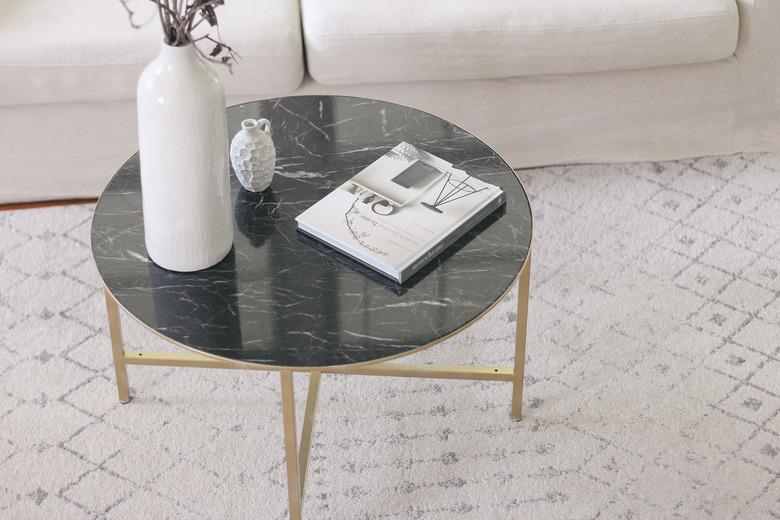
Place the glass top back on the metal base, and your sleek AF coffee table is ready for use!
 Trisha Sprouse
 Trisha Sprouse