We Feel Like Marie Kondo Would Approve Of These DIY Drawer Dividers
Who's up for a little decluttering? At Hunker, we believe that nothing beats a good spring cleaning, and what better place to start than with your drawers. No more throwing things into a disheveled pile. (That's the old you — the new you is turning over a new leaf!) These do-it-yourself drawer dividers are such an easy way to organize your kitchen, bathroom, or bedroom. And the best part is that you can customize them to fit your needs.
Things Needed
-
Craft knife
-
Measuring tape
-
Ruler
Step 1
Take a tape measure and measure the inside length of your drawers from front to back.
 Caroline Burke
Then measure the depth from top to bottom.
 Caroline Burke
Step 2
Mark the length and depth measurements of the drawer onto the balsa wood with a pencil.
 Caroline Burke
Step 3
Take a craft knife and ruler and cut along the pencil lines to create your first divider section.
 Caroline Burke
Step 4
Check that this lengthwise divider fits. You want it to be snug against the drawer at the front and back.
 Caroline Burke
Step 5
Next, measure the width of the drawers.
 Caroline Burke
Step 6
Mark the measurements of the drawer width onto the balsa wood and cut it out with a craft knife. We decided upon six compartments in our drawer so we've cut out two pieces. (If you want more compartments, just cut out more pieces.)
 Caroline Burke
Step 7
Next, we need to create some slots so the dividers will lock together.
Mark a line at the halfway point. (Our width was 9 inches so our halfway line is 4 1/2 inches from the end.) The line should be half the height of the balsa wood. (Our piece was 3 inches high, so the line is 1 1/2 inches high.)
 Caroline Burke
Step 8
Take a craft knife and cut along the pencil line, widen it by approx 1/8 of an inch (or by the thickness of the balsa wood you're using).
 Caroline Burke
Step 9
Cut some slots on the longer divider, however, this time cut slots where you want the width-sized dividers to sit. Cut the slots at intervals that suit the size of the items you want to store; we kept ours an equal distance apart but you could make them closer or further apart to fit smaller or larger items.
 Caroline Burke
Step 10
Once you've finished, slide the dividers together using the slots.
 Caroline Burke
Place them into the drawers.
 Caroline Burke
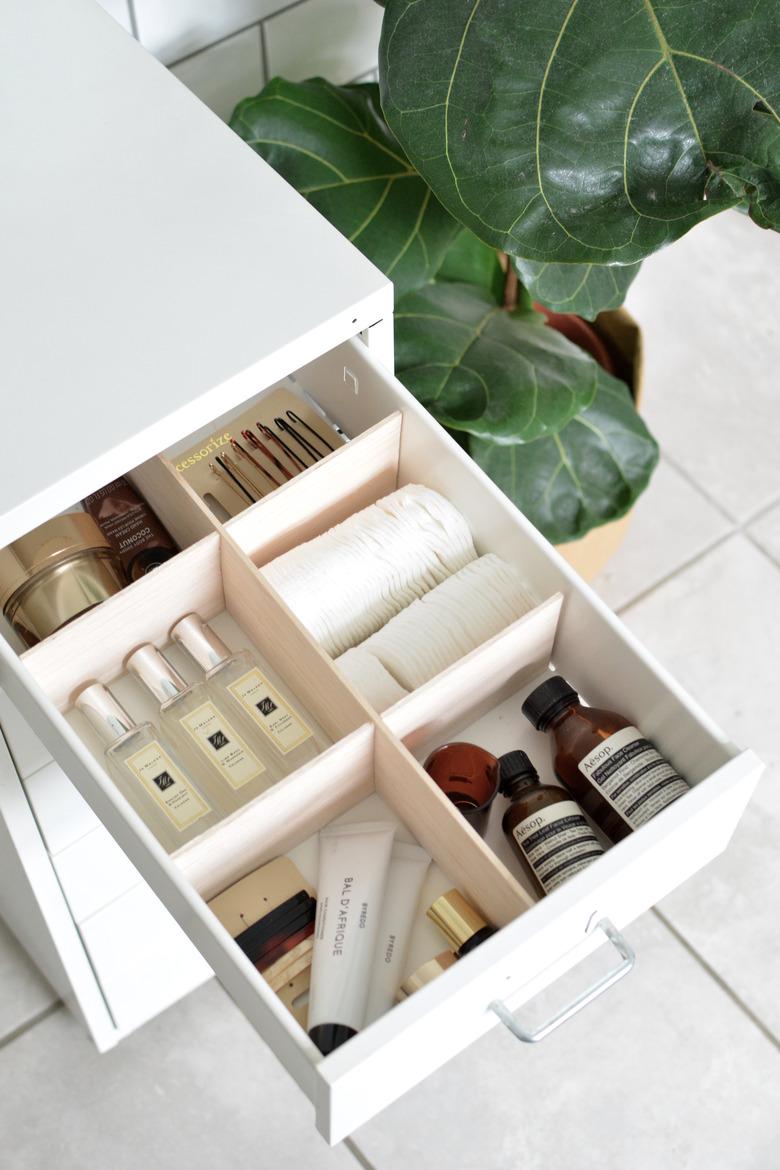
We've used our dividers to organize our bathroom junk drawers ... hey, good-looking.
 Caroline Burke