How To Rewire A Foreign A/C Plug
Things Needed
-
Small flat-head screwdriver
-
Small Phillips screwdriver
-
Wire strippers

Foreign countries such as Europe or the United Kingdom use different plugs to those in the United States and the color of the wiring is different. One distinct difference, apart from the type of plug, is the voltage; in the U.S. it's between 110 and 120 volts, but in Europe it's 220 volts. Most of Europe, including the U.K., conforms to the International Electrochemical Commission (IEC) code meaning that wherever you travel in Europe, the color of the wires used to wire a plug are the same. If you find the wiring to the foreign plug is damaged then as the color of wires in the U.S. is different, it's best to use a foreign plug and use an adaptor to convert it for use in the U.S.
Step 1
Remove the screw on the back of the foreign plug using a flat-head screwdriver or a Phillips screwdriver. Some plugs also have two small screws at the base of the plug. If it does, you need to loosen them so you can insert the wire through the internal fixing that holds the wire securely in place.
Step 2

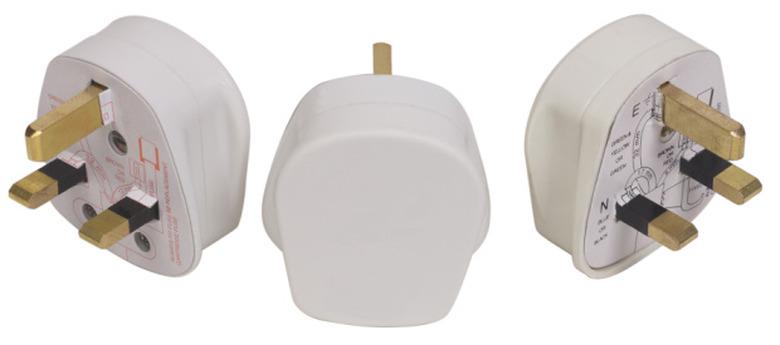
Lift off the foreign plug cover using your fingers to reveal the three terminals connectors. Looking directly at the inside of the plug, the top terminal is the ground terminal, the one lower down on the left is the neutral terminal and the one opposite the neutral terminal is the hot, or live terminal. You can also distinguish the hot terminal as it has a fuse connected to it.
Step 3

Look at the three wires you need to connect to the foreign plug terminals. One is green and yellow striped, meaning ground, another is blue, meaning neutral and the third is brown, meaning hot.
Step 4
Loosen the three terminal screws on the foreign plug using a small flat-head screwdriver. You don't need to remove the screws completely. As you unscrew the screws you will see three holes in the connectors. This is where the wires get inserted.
Step 5
Insert the green and yellow striped wire into the connector hole on the top pin of the foreign plug. Slide the wire in using your fingers then use the screwdriver and tighten the screw. As the screw tightens it firmly holds the wire in place. If you loosened two small screws at the base of the plug earlier then you need to insert the three wires under the connector first as this is used to hold the wire in place.
Step 6
Insert the blue wire into the lower left hand connector hole. Tighten the screw. Insert the brown wire into the right hand connector hole and then tighten the screw.
Step 7
Replace the cover on the plug. Replace the screw in the screw hole and tighten using a screwdriver. If you loosened two small screws earlier then tighten these as well.
Tip
Some plugs in Europe may have the ground pin at the base of the plug and the neutral and hot pins near the top, but adjacent to each other. You can work out which is the ground pin as it is always centrally placed at the top or bottom of the plug and on its own. If you find the metal core of the three colored wires aren't exposed, then use wire strippers and remove ¼ inch of the colored plastic off the ends so you can insert the metal core into the connectors. The plug pins in Europe are round while in the U.K. they are rectangular. You may find that plugs for low-wattage appliances, such as lamps, only use two pins in Europe; neutral and hot. Adapters to convert your European or U.K. plug to a U.S. plug for use in the U.S. are widely available at electrical stores. This means you don't need to wire a U.S. plug.
Warning
Always check your electrical appliances can operate on 120 volts as connecting a 220 volt appliance to 120 volts means your appliance won't operate correctly. Many foreign appliances have a switch on them letting you change the voltage from 220 volts to 120 volts.